Managing Services
Use the Services window to manage services offered to your subscribers. You can create new services and edit them directly in this window.
When you are done setting up your services on this window, you can activate or deactivate the service on your customers’ devices from the Customer Support tab.
The Services window comprises the following:
- Services—A list of all services in the system.
Select to force a refresh of all services and refresh the service list.
Select to add a new service.
Select to delete a service. (This option is only available for custom services.)
Select to save the service.
- User Interface Groups—Lets you create groups of services, which control how services are grouped together onscreen.
Select to add a new user interface group.
Select to delete a user interface group. (Only available for custom groups.)
Select to save the user interface group.
Add a New Service
Overview
- Add service information.
- Configure When Enabled properties
- Configure When Disabled properties—Add the settings, user interfaces, and actions associated with Step 2.
- Select .
STEP 1: Add Service Information
- On the Administration tab, select Services.
- Select to open the Service Editor window.
- In the Name field, enter the name of the service. (This name appears in the list of services on the Customer Support tab or on the subscriber’s control panel.)
- In the Code field, enter a unique identifier for this service.
- In the Color field, select the field to display the color picker. Use the sliders to select a color, or enter RGB, HSB, or hex color values. select
 to set the color. The color appears next to the service name on the Customer Support tab.
 - From the Status menu, choose Active or Inactive. (Active services appear on the Customer Support tab; inactive ones do not.)
- Do one of the following:
- Check the Is Always Enabled check box for services that are always enabled.
- Uncheck the Is Always Enabled check box for services that can be enabled and disabled on the Customer Support tab.
NOTE: If a service is always enabled, you can configure only the When Enabled User Interface properties.
- Choose where and how to display this service:
- Portal Display—Determines where this service appears in the Services list on the Customer Support tab.
- Control Panel Display—Determines where this service appears in the subscriber’s control panel.
From the Group menu, select the user interface group under which this service will appear.
In the Order field, type a number indicating the order for this service within the group. Smaller numbers appear closer to the top.
STEP 2: Configure 'When Enabled' Properties
To configure the properties for a service that has been enabled:
- Configure the access level (to specify whether subscribers can modify settings for this service):
- In the Access Level section, select Add Setting.
- Enter the element of the data model that describes the setting (for example, settings.enabled.timeblocking).
- From the menu, choose None to deny access or Modify to allow access.
(Repeat these three steps for each access level you want to add.)
- Configure the user interface. This lets you control information and settings that are displayed for different user interface areas related to this service, both on the Customer Support tab and on the subscriber’s control panel.
- In the User Interface section, select Add User Interface.
- From the Slot menu, choose how much information to display:
- Detail—Shows detailed information and settings for the selected user interface area. It appears in the window for the service on the Customer Support tab and the subscriber control panel.
- Summary—Information is a brief read-only version of the settings for this user interface. It appears in the left navigation of the subscriber’s control panel.
- Help—Lets you display helpful information in the subscriber’s control panel.
- Status—Reserved for future use.
- LAN Device Detail—Appears within the control panel when the user is viewing a particular local device. It shows device-specific information and settings for the service.
- LAN Device Summary—Appears on the subscriber’s control panel when they pause the mouse over a device.
- From the menu, choose one of the available user interfaces.
- Enter values for Portal Order and Control Panel Order to determine the order in which user interface information is displayed. Smaller numbers appear closer to the top.
- Select the roles the user interface is visible to:
- Admin—Appears to Admin users only
- CSR—Appears to CSR users only.
- Subscriber—Appears on the subscriber’s control panel.
(Repeat these three steps as necessary to add additional user interfaces.)
- Configure Actions:
- In the Actions section, select Add Action.
- From the Actions menu, choose an action:
- sync app—Synchronizes an application. Choose the application from the Application menu.
- run script—Runs a script. Choose a script from the menu.
- set attribute value—Sets a value for a data model element. Enter the setting and value. Check the Force check box to change the value regardless of prior setting; uncheck the Force check box to leave an existing value unchanged.
- remove attribute—Removes a setting from the data model. Enter the data model element.
Edit a Service
- From the Administration tab, select Services in the left navigation bar.
- Locate the service from the Services List.
- Edit the desired fields.
- Select .
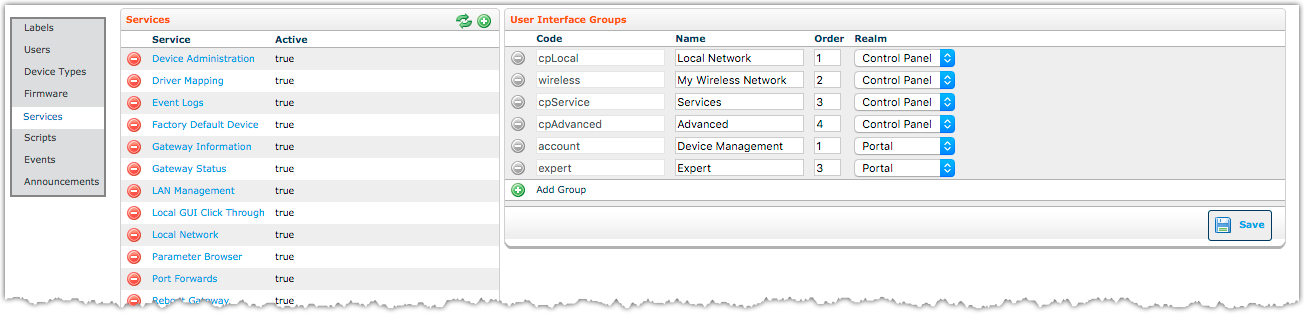
Managing User Interface Groups
User interface groups let you control how services are grouped together on the Device Manager Customer Support tab and on the subscriber’s control panel. Once you have created the groups that make sense for your users, you then assign new and existing services to those groups.
Add a User Interface Group
- From the Administration tab, select Services in the left navigation bar. The system displays the User Interface Groups window.
- In the User Interface Groups window, select .
- In the Code field, enter a unique identifier for this group.
- In the Name field, enter the name of the group.
- In the Order field, type a number indicating where you want this group to appear in the list. Smaller numbers appear closer to the top.
- From the Realm menu, choose where this group appears:
- Portal—Appears on the Device Manager Administrator tab in the Services list.
- Control Panel—Appears on the screen used by subscribers to manage their services.
- Select .
Editing a User Interface Group
To edit a user interface group:
- From the Administration tab, select Services in the left navigation bar.
- Locate the service in the User Interface Group window.
- Edit the desired fields.
- Select .
Deleting a User Interface Group
Only custom user interface groups can be deleted from the system.
To delete a user interface group:
- In the User Interface Groups window, locate the group you want to delete.
- select to delete your custom group from the system. The system refreshes the page, listing the remaining groups.