Network Performance Test
Network Performance Testing (NPT) is a TR-143 based solution that enables providers to test their service delivery speeds (upload, download and latency) via Device Manager using CPE devices deployed with the properly equipped firmware. This feature is fully compliant with FCC requirements including Connected America Fund (CAF) testing but has been expanded to encompass the general purposes of network performance testing.
This feature requires Device Manager v10.5.0.2 or later for best results. Should your Mosaic Device Manger instance and plug-ins require an upgrade, submit an Adtran support request to ensure full support for NPT is present. You'll find complete tutorial for opening a support request including video walk-through and other helpful links here. Other requirements and preparatory steps are available in the Network Performance Test - Preparation article and should be reviewed and understood before proceeding.
Don't miss the free and comprehensive training course on the topic of Network Performance Testing offered at Adtran University. Use this link to sign up. Your adtran.com login is required to access this resource. Upon successful login, you may need to return to this page to select the link again.
Several tiers of speed testing are supported:
- 100 megabits down and 10 megabits up
- 25 megabits down and 3 megabits up
- 10 megabits down and 1 megabit up
- 4 megabits down and 1 megabit up
At this time, performance testing at gigabit speeds is not supported by Adtran CPE devices. If you encounter a requirement for additional tier(s) not listed above, contact your Adtran sales representative to make your needs known.
This article assumes that all of the one-time setup steps associated with Scripts, Labels and Globals for each tier being tested have been completed in your Device Manager instance.
Utilizing Network Performance Testing requires a thorough understanding of the Bulk Operations and Labels features of Mosaic Device Manager. This article assumes the reader has mastery of these features. Use the links above to learn more.
STEP 1: Label the test group
- Create a label for each tier you are testing, and select the specific devices that are a part of that tier, or select from existing Labels in your system such as FCC 25_3 or FCC 10_1. To create a label select Administration->Labels then select the + button to create a label. Add a name for the label as “FCC_<tier>”. Learn more about adding Labels here.
- Apply the appropriate Label to all CPE devices associated with a specific test tier by selecting Customer Service from the horizontal menu bar near the top of the screen, search for the specified device, select the checkbox to the left of to each. Finally at the bottom of the screen, use the Device Label feature to apply the appropriate label.
For FCC testing, test sites to be included in the sampling of your subscriber population are dictated by the information you received from the USAC/HUBB portal. Strict management of your devices in each label is imperative to reporting all required results to USAC.
Do not use a comma in any reportable field. Commas will cause any exported CSV files to be formatted incorrectly.
STEP 2: Initiate the test
This operation will overwrite results stored from the previous test, if one has been conducted. Ensure you have collected all the test data (instructions below) from your previous test run before initiating another test.
Verify a single device
Use this feature to test a single CPE and to dial in your test settings, upload and download file sizes, etc. This helps to ensure smoother operation once you transition to bulk testing with multiple devices.
- From the main Customer Support tab, search for and select the customer record for the individual device you wish to test.
- From the left navigation bar, expand the Expert drop-down list and select Network Performance Test.
- Add a check-mark to the Marked for Testing checkbox.
- From the NPT Tier Selection drop-down menu, choose from one of the pre-configured tiers or select Custom Settings.
- In the Parameters section, complete the fields to define your desired Start Time e.g. 2021-03-28T18:00:00 and End Time e.g. 2021-03-28T23:59:59.
- Use ISO Date/Time Format as seen in the example above. YYYY-MM-DDTHH:MM:SS (Use 24 hour time format.)
- The time is expressed as the local time zone where the CPE is located unless a trailing "z" is added to optionally specify UTC time.) Be mindful of this if you manage and test devices located in multiple time zones and set each device according to its location.
- Optimal duration for testing is 5 minutes.
- Select the blue Save button near the upper-right. Wait for completion.
The NPT configuration is now pushed to the device. The test is started per the date and time specified after the NPT Tier Selection.
Custom settings are helpful when atypical parameters are required that are don't conform to the pre-configured Tiers available for selection from the NPT Tier Selection drop-down list. If Custom Settings are needed, provide values for the parameters described in the table below.
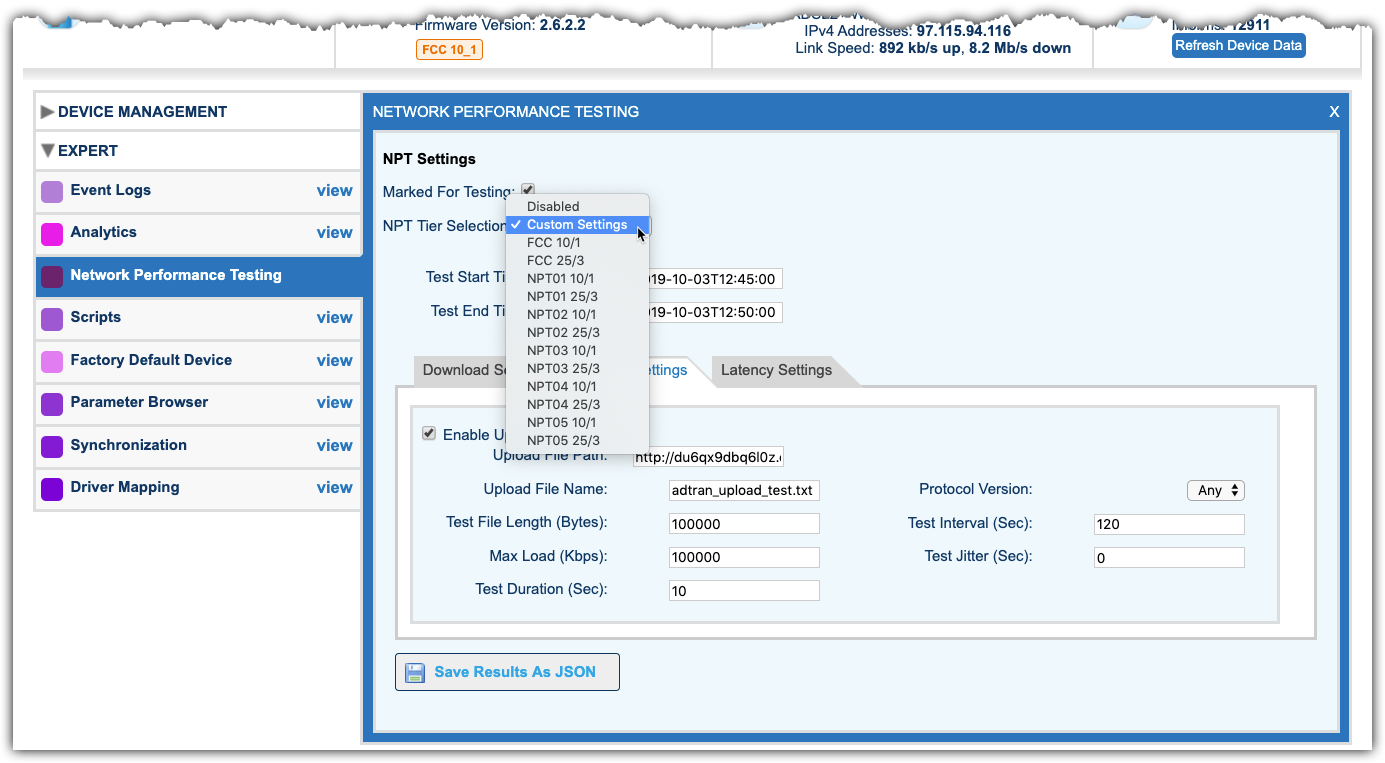
Custom Settings begins with completing the fields for Test Start Time and Test End Time in ISO Date/Time format YYYY-MM-DDTHH:MM:SS. (Use 24 hour time format. Optimal duration for testing is 5 minutes. The time is expressed as your local time zone unless a trailing "z" is added to specify UTC time.)
Next, advance to the tabs described in the table below and enter values for Download Settings, Upload Settings and Latency Settings.
| Download Settings | Upload Settings | Latency Settings (UDP) | Latency Settings (ICMP) | Parameter | Description |
| • | Enable Download Testing | Check this checkbox if you wish a download performance test to be conducted. If you do not wish to conduct a download performance test, disregard the remaining fields on this tab and proceed to the Upload Settings or Latency Settings tabs. | |||
| • | • | Retry On Failure |
If this checkbox is left un-checked, and the test fails for one of its test intervals, the interval is marked as failed. When this option is checked and the test fails, the test will be re-attempted throughout the balance of the time remaining for that test interval. If one of the re-tries is successful, the interval will be marked as a success. If all retries fail, the interval will be marked as failed. |
||
| • | Download URL | The HTTP or FTP URL pointing to the file you’ve prepared to be used for this test. | |||
| • | • | • | • | Max Load (Kbps) | The cutoff of existing loop utilization at which a test will be deferred. e.g. If the subscriber is already utilizing n Kbps or greater, the test will be deferred until the load drops below this threshold. |
| • | • | Test Duration (Sec) | The length of the test - expressed in seconds. | ||
| • | • | • | • | Test Jitter (Sec) |
Test Jitter staggers the start times of the test by a random number of seconds to help ensure the availability of the file being moved or server availability. Jitter chooses a random number of seconds to delay the test within the test interval. The value specified here is the max possible number of seconds. |
| • | • | • | • | Protocol Version | Select from Any, IPv4 or IPv6. Your selection can be limited by the capability of the CPE device being tested. Consult CPE device documentation to confirm supported protocols. |
| • | • | • | • | Test Interval (Sec) | The frequency with which tests are run. e.g. Enter a value of 3600 to provide for an hourly test. (Expressed in seconds. Minimum suggested value is 120 seconds.) |
| • | Enable Upload Testing | Check this checkbox if you wish an upload performance test to be conducted. If you do not wish to conduct an upload performance test, disregard the remaining fields on this tab and proceed to the Latency Settings tab. | |||
| • | Upload File Path |
The HTTP or FTP path pointing to the test server and destination directory you’ve prepared to be used for this test. Example: http://youservername/upload_tests/todays_date/Upload_Test.txt Alternatively, you can omit the file name at the end of the path however it is then REQUIRED that a file name be specified using the Upload File Name parameter (below). Example: http://youservername/upload_tests/todays_date/ Ensure that the final character is a "/". |
|||
| • | Upload File Name |
(Optional) Allows customization of the file name for upload tests to ensure that the series of saved files on the destination test server have unique names. The value entered into this parameter will replace the file name you specified at the end of the Upload File Path parameter (above). The saved test file names can be dynamically customized using options from the list below.
An example entry for Upload File Name might look like: upload-%M-test.txt Selection of one of the list of variables however is not required and a strictly literal upload file name is acceptable. Example: My_Upload_Test.txt |
|||
| • | Test File Length (Bytes) | Enter the size of the file transfer to be transmitted during an upload speed test. File size is expressed in bytes. File must be large enough to facilitate the Test Duration. | |||
| • | • | Enable Latency Testing | Check this checkbox if you wish a latency performance to be conducted. If you do not wish to conduct an upload performance test, disregard the remaining fields on this tab. | ||
| • | • | Latency Test Protocol | Select the required protocol from the drop-down list. Select from ICMP, UDP*. | ||
| •* | UDP Port | This field is only required when UDP is selected under the Latency Test Protocol tab as the protocol. | |||
| • | • | Latency Host | An IP or Domain for your designated echo test server. | ||
| • | • | Timeout | The number of seconds before an echo test will stop and flag the test as failed. Successful tests will instead report a send time and received time. |
Once the custom settings have been entered as required, select the blue Save button near the upper-right. Test results are available at the end of the specified Test Duration.
Bulk test all devices in your test pool (most common)
This operation will overwrite results stored from the previous test, if one has been conducted. Ensure you have collected all the test data (instructions below) from your previous test run before initiating another test.
Before proceeding, it is important to understand the overall workflow associated with creating and running the bulk operation, followed by generating the reports. An outline of this is below:
-
Create the Bulk Operation for a specified time before the NPT tests should start.
-
The Bulk Operation executes. Any devices that are successfully solicited, or inform during the period receive the test parameters sent by Mosaic Device Manager (this is not the same as executing the test)
-
The test is executed by the CPE at the specified time for the specified duration
-
During and after the test, the devices report results up to Mosaic Device Manager with Diagnostic Complete events.
-
After the test is completed, you must manually retrieve the reports before the next day of testing to assure no data is lost.
Create the Bulk Operation
- Use the Bulk Operations feature to create a new bulk operation.
- Enter a name for this Bulk Operation in the Name: field.
- Add a check mark to the Solicit Devices checkbox.
-
A value for Solicit Attempts must be selected when the Solicit Devices option (above) is checked. This parameter dictates how many times the system will attempt to reach a CPE device for processing of a bulk operation. The default selection is 1 solicit attempt. We recommend a value of 3 for this setting.
-
In the Max Sessions field, enter the number of maximum concurrent sessions that this bulk operation should be allowed to consume. For purposes of Network Performance testing, we recommend a value of 5 or fewer for this setting.
- From the Actions drop-down list, select NPT Start Test.
- In the Parameters section, complete the fields to define the Start Time e.g. 2021-03-28T18:00:00 and End Time e.g. 2021-03-28T23:59:59.
- Use ISO Date/Time Format as seen in the example above. YYYY-MM-DDTHH:MM:SS. (Use 24 hour time format.)
- The time is expressed as your local time zone unless a trailing "z" is added to specify UTC time.)
- The optimal duration for testing is 5 minutes. Note that FCC PMM Testing requires testing from 6:00PM to 12:00AM device local time.
In Bulk Operations, due to the nature of scripts, an error will not occur if time format is entered incorrectly. We strongly recommend testing single device to verify time entries are properly formatted before proceeding with the test for the entire tier.
- Under the Schedule section, select Once from the Run drop-down menu. Select the day of the week you wish to push the NPT configuration to the devices. Take note that you will need to generate NPT reports for any prior NPT test runs before this job executes to avoid losing prior test results.
- Enter the Beginning Date and Ending Date when the Bulk Operation should run to program the selected pool of CPE devices to be tested. The date specified here should be the same date used in step #3 however the time should be a duration that starts and ends before the actual NPT test is set to begin. If a device is not solicitable during that time period, it will need to inform for it to receive the test parameters. If this does not occur, it will fail to produce results.
- In the Run from field, enter the time the Bulk Operation should run. The Bulk Operation must be completed well ahead of the time specified above for when the CPE will begin executing the test.
The Bulk Operation needs to happen first as its job is to push test configuration parameters to the CPE. The Parameter for Start Time in step 7 tells the CPE when to actually begin the test. Thus, the time of day entered in step 7 must fall later than the time that set for Device Manager to run the Bulk Operation in step 10 (Run From).
We recommend the Bulk Operation be set to complete 2+ hours before the CPEs are set to begin testing. Consider testing your bulk operation to determine how much time was required to push test parameters to all of the labeled devices in the tier you are testing.
- In the Filter Criteria section, create a filter for the Label you applied to your pool of test devices in the Label the test group instructions above. You can test multiple tiers/labels in the same bulk operation.
- Select the Create button in the lower-right corner of the screen to commit your bulk operation.
- To confirm that the NPT parameters were accepted by the CPE, check the script log of at least one device of each model (device type) to confirm that the CPE accepted the parameters. See Working with Scripts for more information.
The CPEs will automatically begin testing at the time you specified in step 7.
STEP 3: Download test results from Device Manager
The following is a manual process that must be performed daily. If this step is skipped today, the data retrieved from the CPEs by Device Manager in STEP 3 from this test run will be overwritten tomorrow when the tomorrow's bulk operation runs.
Test results are stored on the CPE device until collected by Device Manager. This happens automatically when the “Diagnostic Complete” event triggers the execution of the “NPT - Get Results” script. This automated script transfers the test results from the CPE to Device Manager by synchronizing the NPT application. It is not necessary to run another bulk operation or take additional action.
The results are typically collected and available for viewing just a few minutes after the test End Time you specified in earlier steps described above.
Retrieve the Test Results
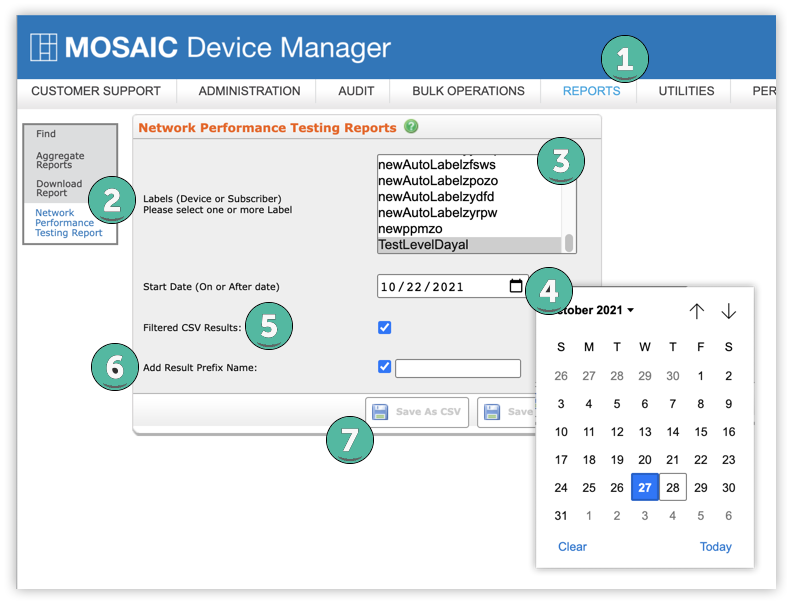
- From the horizontal navigation bar, select REPORTS.
- From the left navigation bar, select Network Performance Testing Report.
- Select the name of the Label associated with the test group for which you wish to retrieve performance test results. This would be the same label previously applied to the pool of test devices in the Label the test group instructions above. To create report output for multiple test groups, Shift-select multiple labels from this list. However, it is recommended to only generate results for one label at a time if you are performing FCC PMM testing. It is also recommended that when downloading the file, you immediately rename it to denote the associated Tier and date results to categorize the data.

- Use the calendar interface at the Start Date (On or After date) field to specify the start date for a test previously conducted using the Initiate the Test instructions above. For example, if you tested on the previous night from 6:00PM to 12:00AM, you will need to generate reports for yesterday’s date.
- A Device Query Count will appear in the Report Results box to the right.
- (Optional) The Filtered CSV Results option will consolidate all test telemetry down to one test per hour for both upload and download testing and one test per minute for latency tests. The data is arranged in a hierarchical fashion to highlight Success -> Deferral -> Error states of outcome for submission of CAF test data to the USAC/HUBB portal. Generally for PMM testing, it is recommended to generate Bandwidth filtered, and Latency Unfiltered.
“Success” takes precedence over “Deferral” which takes precedence over “Error”. Thus if the test results for a given location of service resemble this...
14:45:00 Error
14:46:15 Error
14:47:23 Deferral
14:48:45 Deferral
14:49:27 Success
...then the filtered result appearing in the CSV output is the final "Success" entry.
- (Optional) Select this checkbox, then enter a custom prefix to be appended to the filename of the report you have selected for download.
- Select the Save As JSON or Save As CSV button to save the report output to your local drive for later examination or distribution. *
The name of the output file is displayed to the right in the Report Results box. The file can then be retrieved under Download Report at the left navigation bar. The default report name is:
<mmdd>_<hostname>_BWD_<label name>_<U/F>_<8 Char unique value>.<file format> - Open the .csv file and note the empty column for "Location ID". This column must be manually populated by you prior to submission of these test results to the USAC/HUBB portal if performing FCC PMM testing, or the file will not be accepted.
In coordination with the recently revised upload validation criteria performed at the USAC portal, Mosaic Device Manager, Network Performance Test reports now include a line item for bandwidth and latency tests for which no data was received. The Comment column in the report will state "Device data not received" when this condition occurs.
Mosaic Device Manager v10.7.0.1 or later is required for full FCC test data submittal compliance. In previous versions of Mosaic Device Manager, if no data was retrieved from a CPE device under test, there was no data in the report output to indicate the test was attempted.
Step 4: Interpreting the test results
Now that you have test output data in hand, it's a fair question to ask, "Did we pass?". Here is one method to help you to read the bandwidth report and determine if the CPE devices tested are passing or failing FCC requirements.
The data in the Mosaic Device Manager report output is represented in bytes so the first step is to convert the bytes_transferred to bits per second. The formula for this is:
bytes_transferred * 8 / test duration / 1000000. Refer to the PMM Quick Tips Guide at www.usac.org for more information.
If you are viewing the CSV data from Device Manager in Excel, try using the following formula.
=G2*8/IFS((MID(F2,18,2)&"."&MID(F2,21,3))-(MID(E2,18,2)&"."&MID(E2,21,3))<0,(MID(F2,18,2)&"."&MID(F2,21,3))+60-(MID(E2,18,2)&"."&MID(E2,21,3)),(MID(F2,18,2)&"."&MID(F2,21,3))-(MID(E2,18,2)&"."&MID(E2,21,3))>0,(MID(F2,18,2)&"."&MID(F2,21,3))-(MID(E2,18,2)&"."&MID(E2,21,3)))/1000000
Follow these steps for employing this Excel formula:
-
Copy the formula text above and paste it into cell J2 in the bandwidth report.
-
Copy from cell J2 then paste it down the rest of the rows in column J. The cell references in each copy must increment and become relative to the new row number for each copy of the formula.
-
The calculation results now displayed in column J should simplify assessment of which devices fell within or outside of the FCC spec for the tier tested. For bandwidth testing, the results must generally average higher than 80% of the subscribed tier.
-
For latency, simply average the latency results of each device result together. These must average to be less than 100ms. For more details on compliance, see the PMM Compliance Calculations Guide.
Video Tutorial - Part 1
Video Tutorial - Part 2
RELATED ARTICLES:
Network Performance Test - Preparation